Box of Secrets
Discreetly modding my friend’s apartment intercom to work with Apple Home.
Tags: hacking, hardware, programming
My friend Frank (not his real name) hosts a lot of guests at his apartment, and his complex’s intercom is what ushers them inside. You’ve probably seen them before, they look like this:
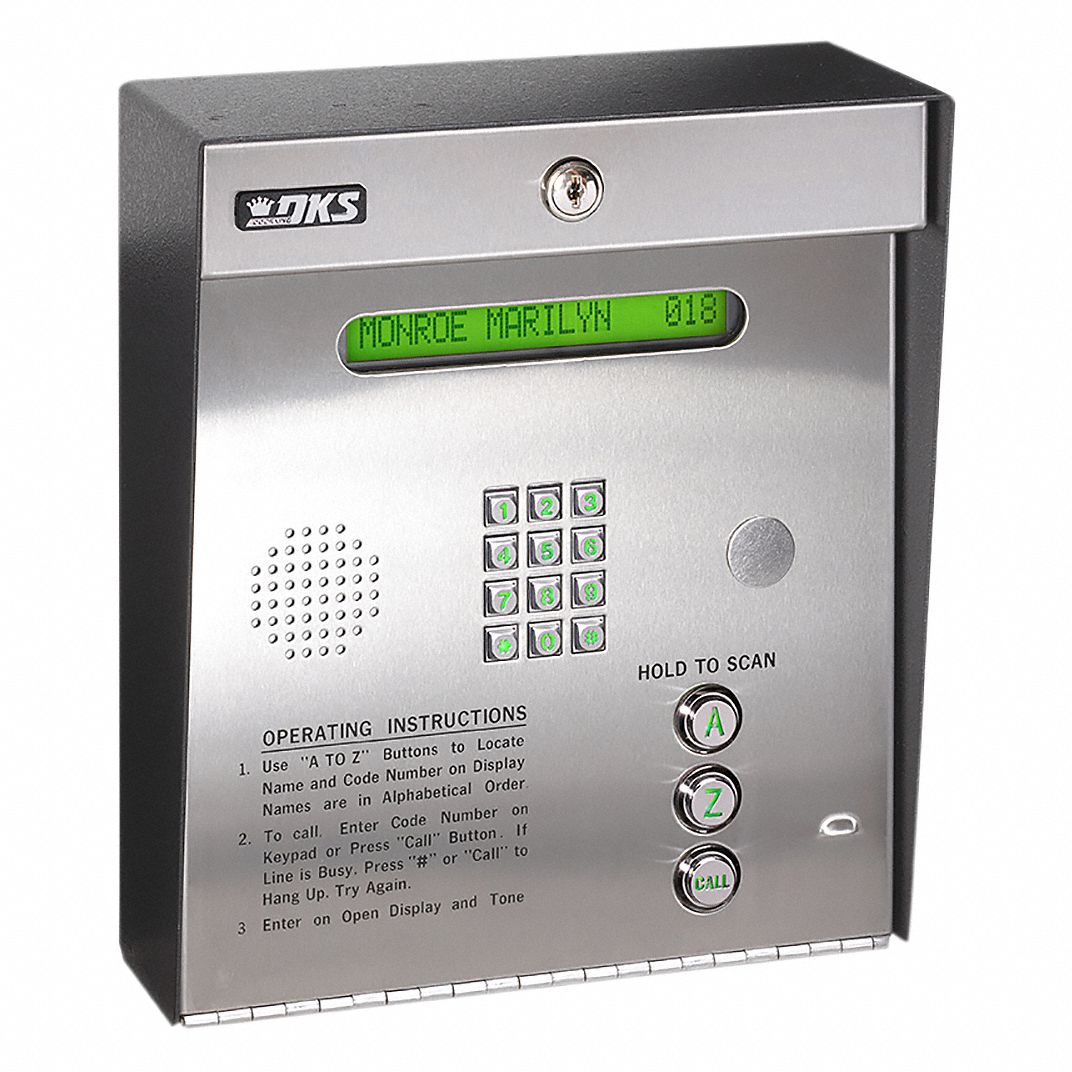
Up until recently, guests could find Frank’s number in the system and give it a call. If Frank recognized the people on the line, he would press a number on his dial pad, which the controller would interpret as a signal to unlock the gate.
Then, management got lazy. The complex Frank lives in failed to renew their intercom’s cellular service, so it could no longer make calls for the voice system. Even after months of asking his landlord to fix it, nothing was done.
Help Arrives
My other friend Hazel and I arrived to visit Frank during this outage period, and he asked us to see what we could do. Here’s what we saw:
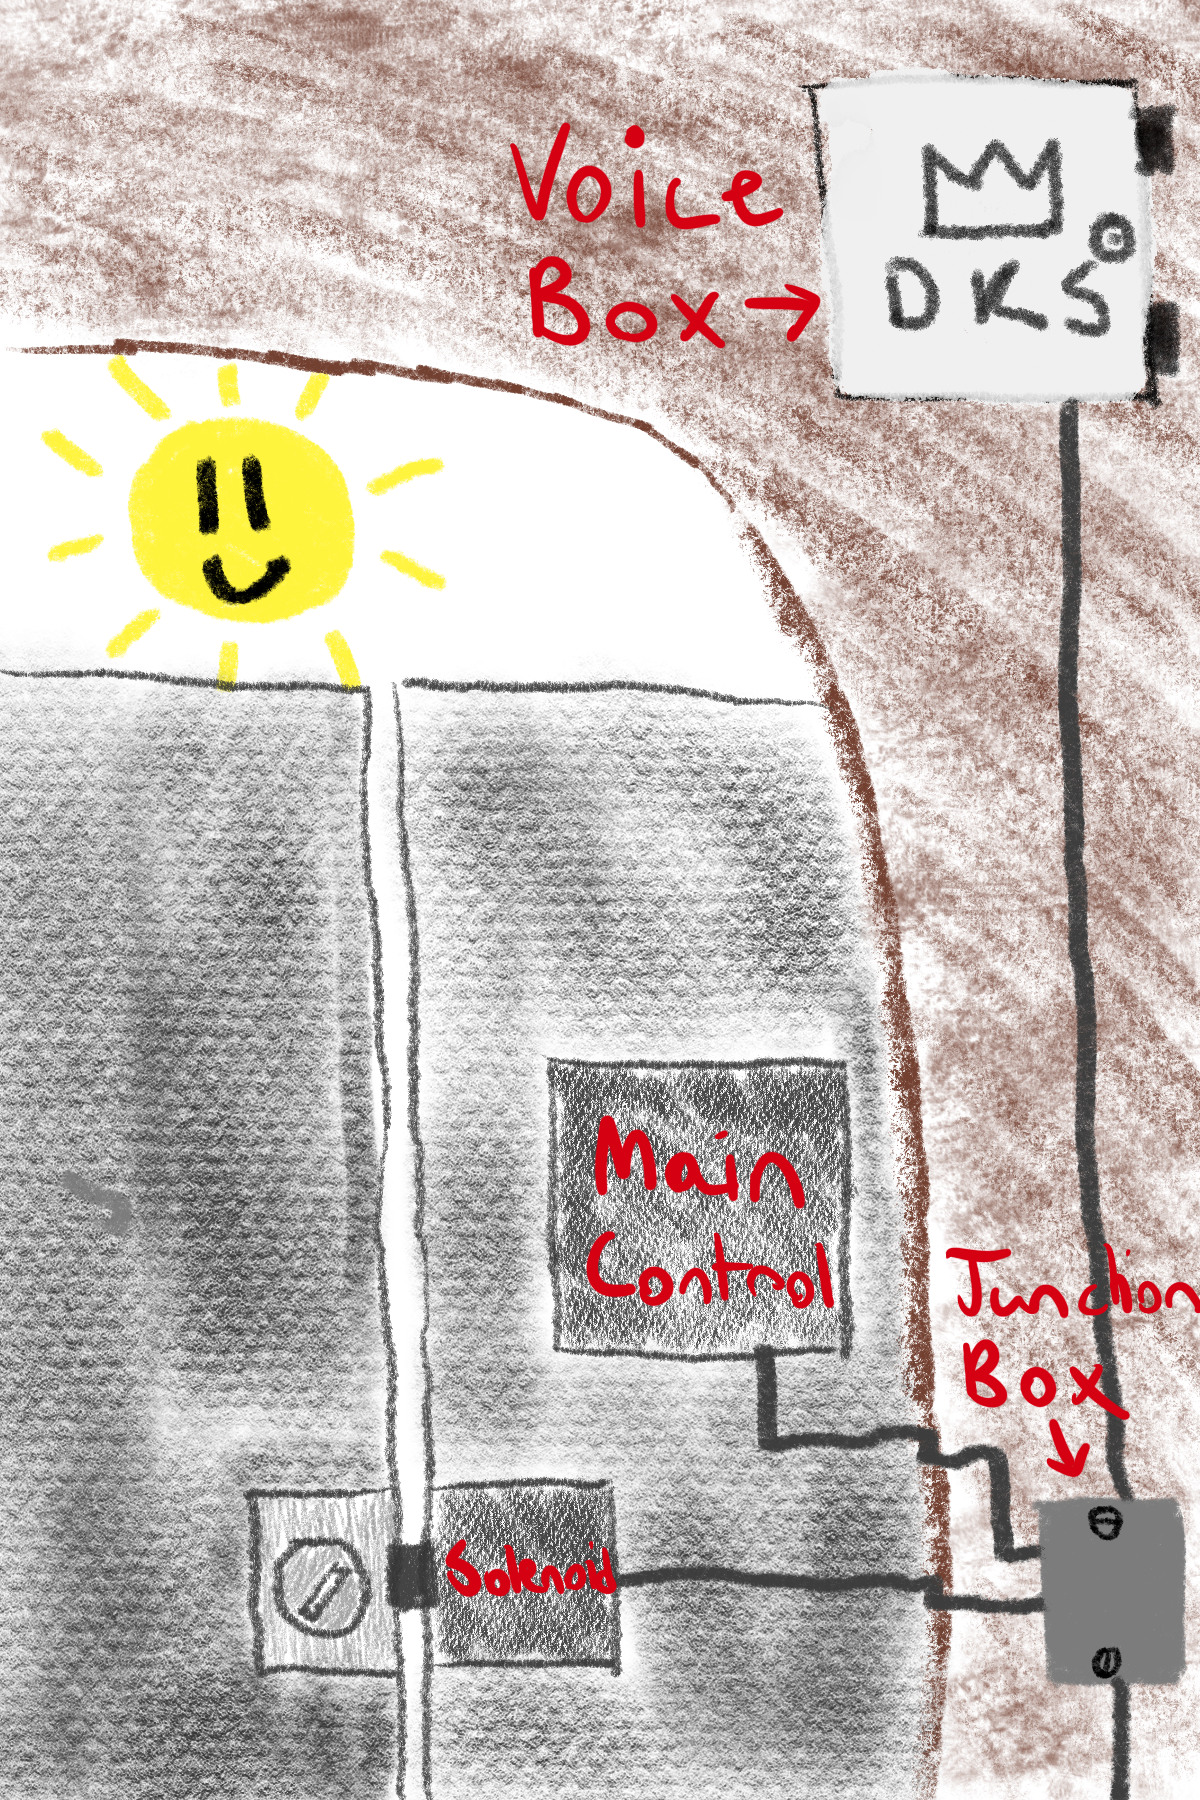
We inspected the top box closer, giving a promising result: it was unlocked! The general layout of the box is as follows:
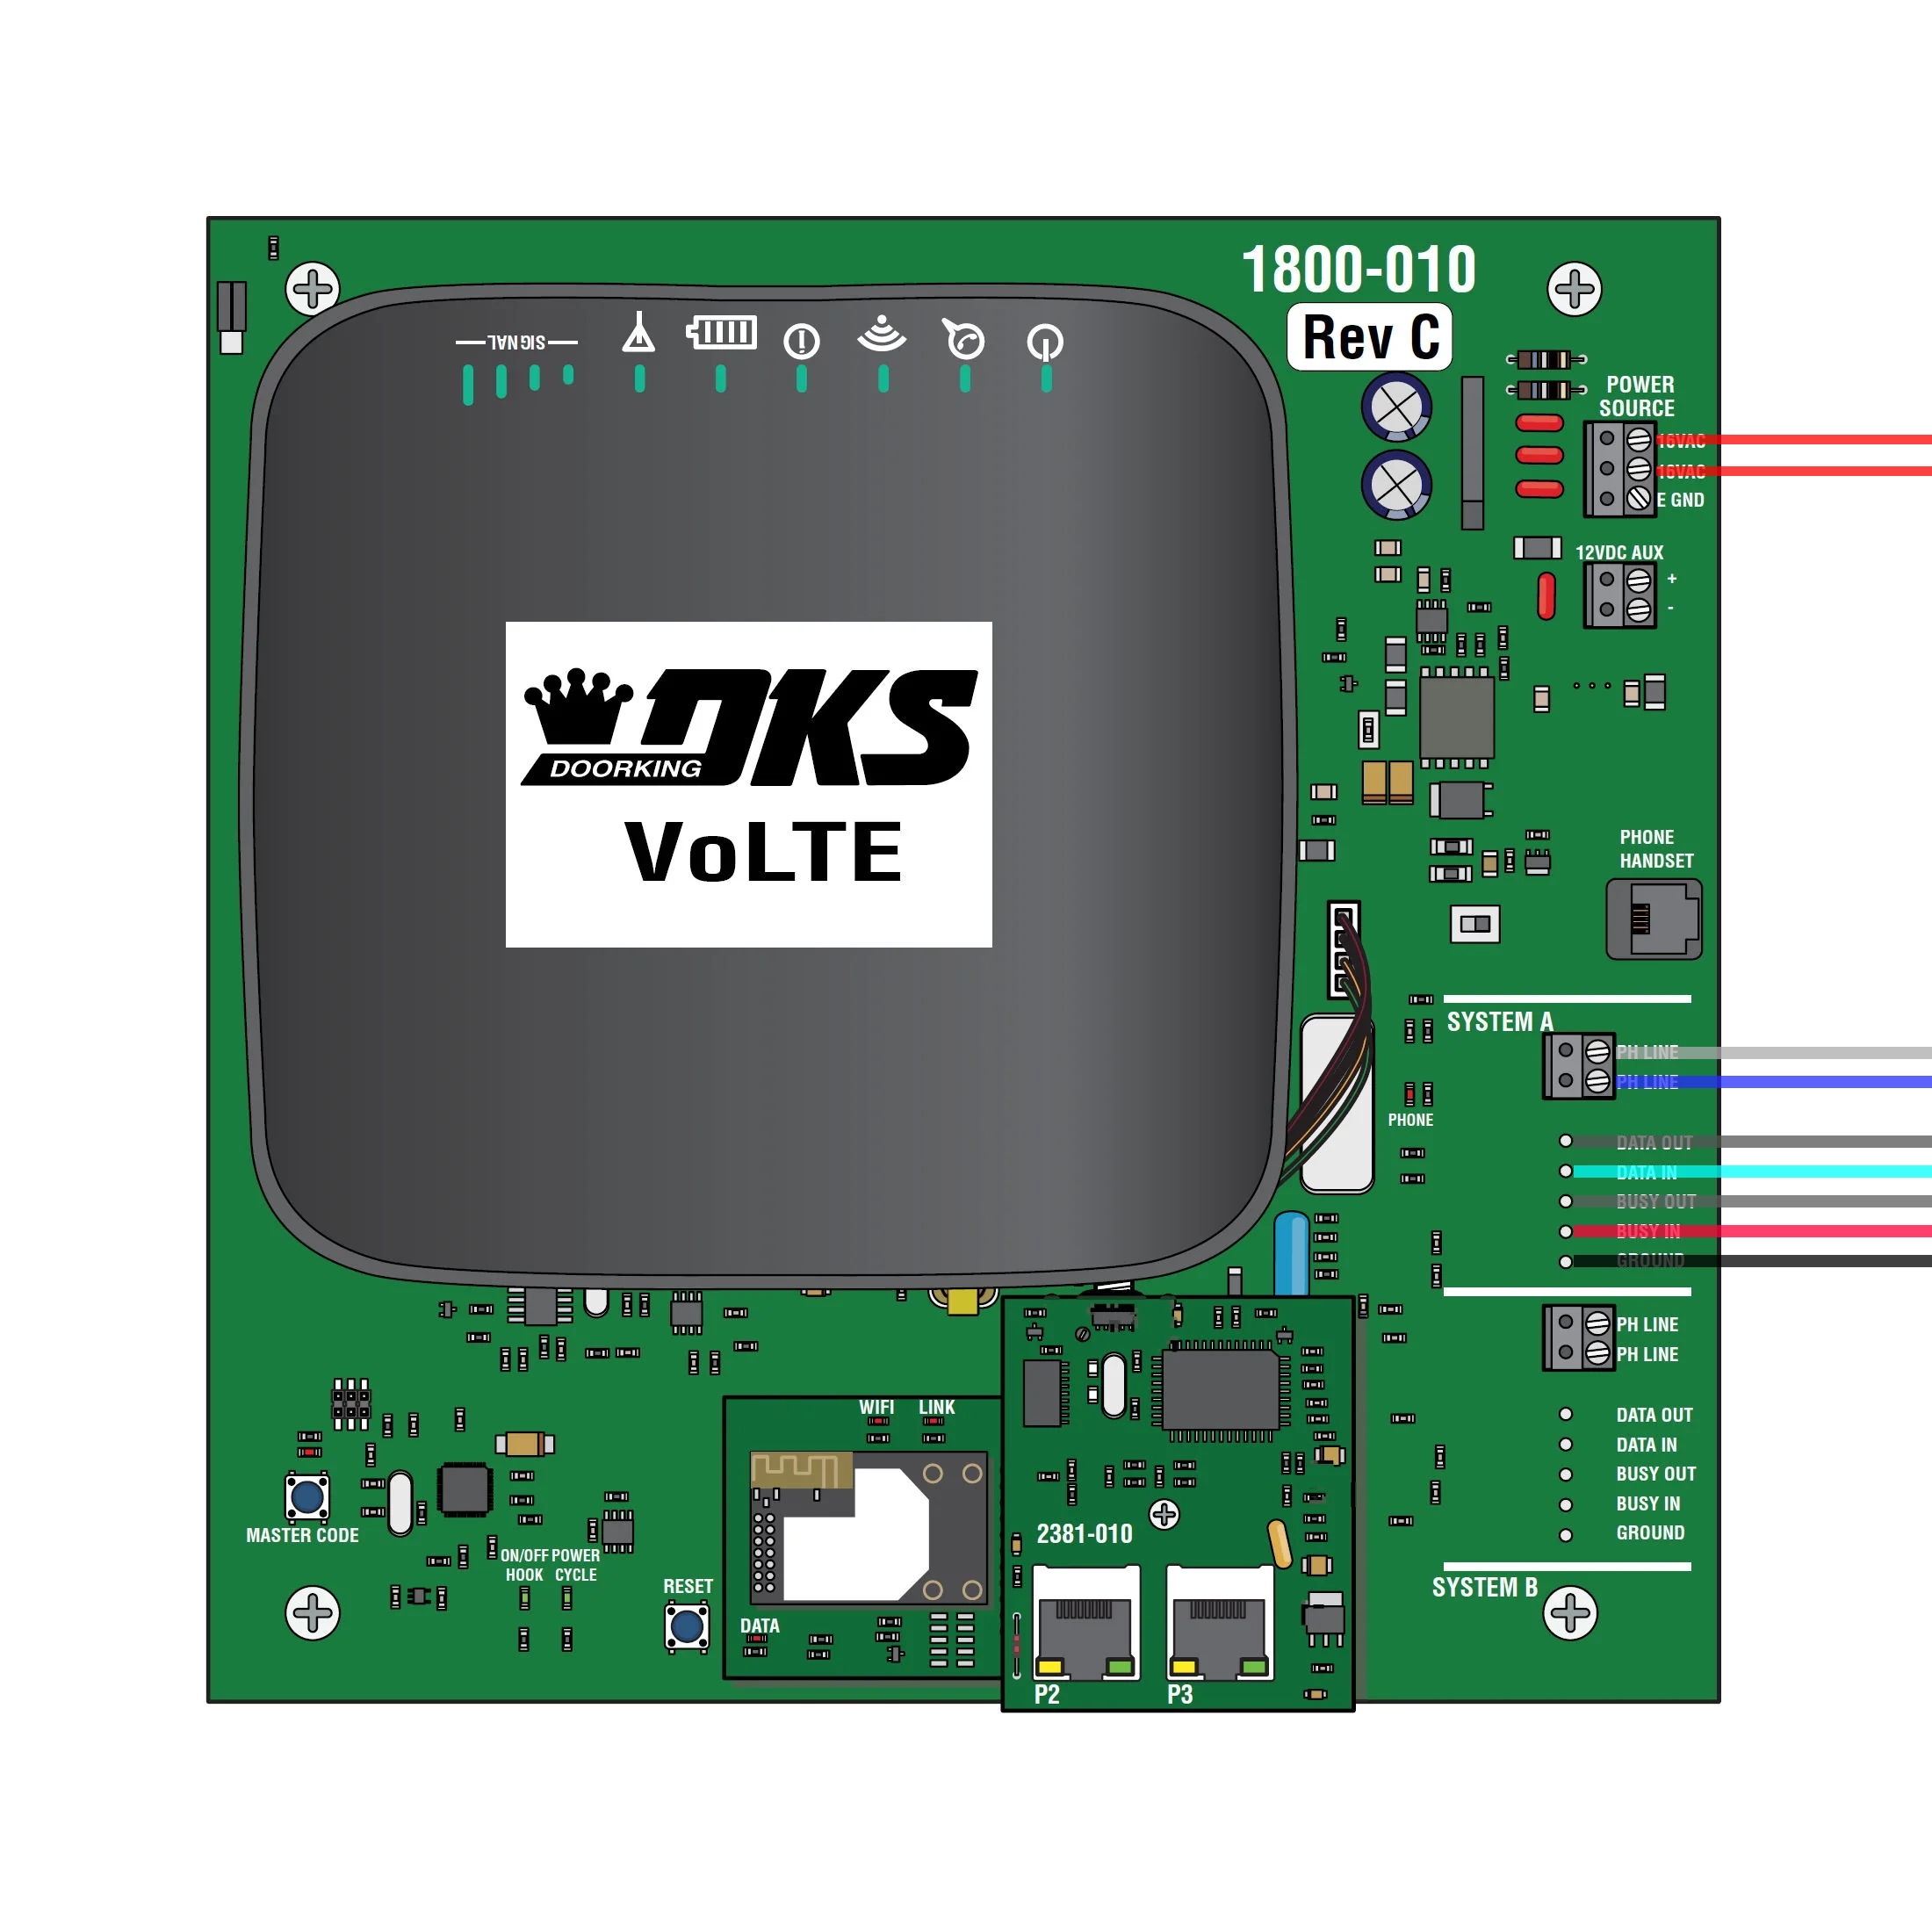
It was impossible to ignore the massive Wi-Fi/cell router in the top corner with its admin password printed right on it (not pictured). Of course, I had to investigate.
Attempt 1: The Wi-Fi Router
I quickly found the network and entered the login credentials shown. Of course, they weren’t changed from the defaults. I had full admin access to the router, which was awesome, until I realized that I couldn’t do very much with its basic, locked-down interface. This almost ended my exploration, but then I realized: what about SSH?
AT&T, the company that makes the routers for Doorking, is smarter than a bag of rocks in that SSH is protected on their router. Sadly for them, they lose to the bag of rocks in providing a way to download their entire system configuration from the web interface, containing a way to reset the root password to whatever you want:
# This file is an exported configuration from NetComm Bovine platform based device.
# Private fields are encrypted but any configuraiton entry can be manually replaced by
#   a plain-text variable or URI-encoded text.
admin.firewall.enable;1
admin.local.enable_http;1
admin.local.enable_https;1
admin.local.ssh_enable;1
admin.local.telnetenable;1
admin.open.port;
admin.password;
admin.user.admin;$aM9VdmCoc5vuekVU70/Gl8iJTOujxMQo
admin.user.root;$DDDgp0GJy6nB29UX7pDlrUUKDkWYqp84
Wow. I now see why router vulnerabilities are so common.
This was certainly a promising avenue, but we realized something: even if we gained code execution on the router, we would have to figure out its custom serial protocol to even have a chance at talking to the main control box. This wasn’t something Hazel and I wanted to spend our entire vacation doing, so we decided to look elsewhere.
Attempt 2: Faking a Phone
Looking at the other terminals within the box, we saw the PH LINE phone connectors for each system. This was promising, since Frank’s existing intercom system used DTMF signals to open the gate back when it was working.
However, it was unlikely that the main control box would blindly accept any phone commands while not actively listening for them after a user had asked it to. It would’ve been possible to test this hypothesis, but we were again left with the reality of extremely limited debugging capabilities, in addition to minimal knowledge of phone signaling systems.
Third Time’s the Charm: Man in the Middle
Hazel and I knew there had to be some vulnerability in the system that would allow us to inject our own commands into the gate control system. We were correct, but we first needed a change in perspective. Our initial assumption was that we needed to take top-down control over the system to make it do what we wanted. After our previous failures to do so, we changed our goal to take bottom-up control of the system: undermining it at its core.
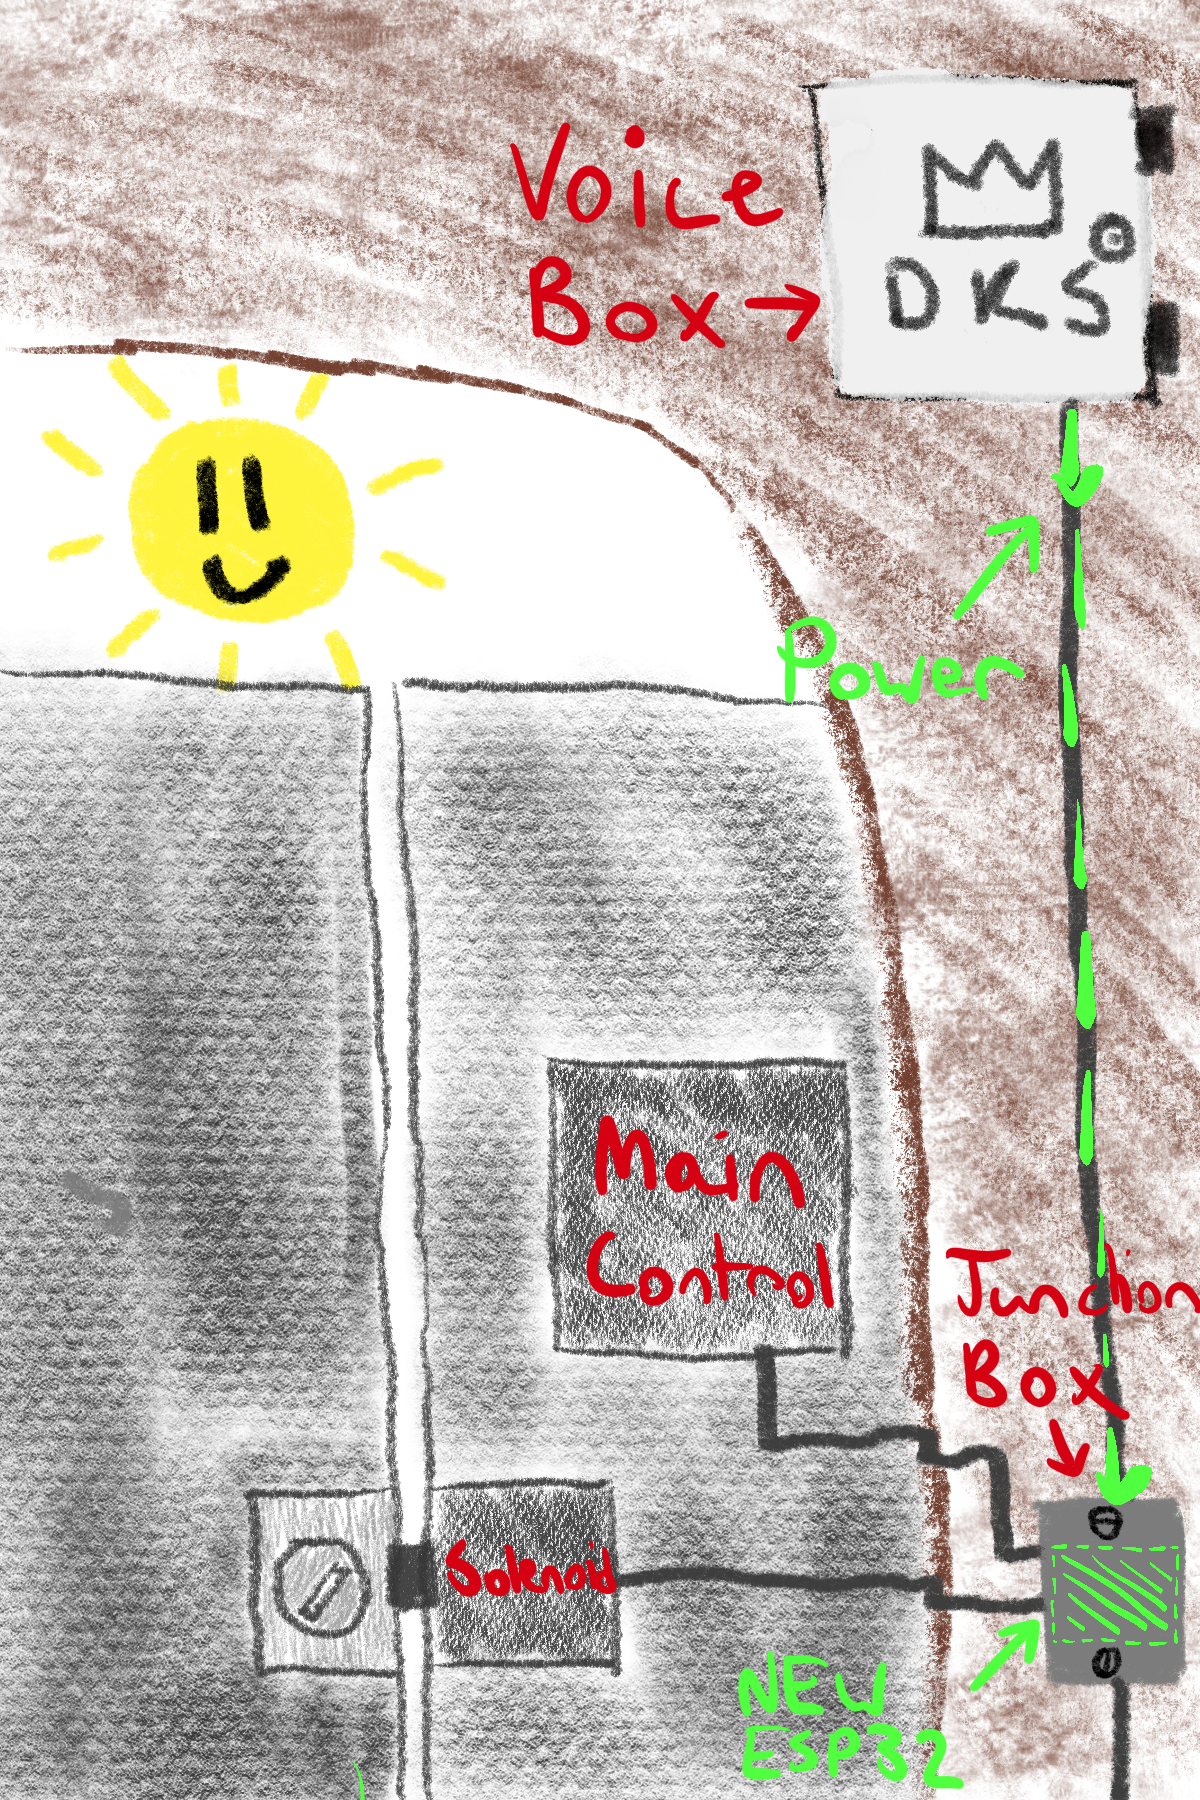
We expanded our search past the voice box to the main junction box that routed the wires between the voice box and the (inaccessible) main controller. After unscrewing two flathead screws, we were met with an interesting surprise: an extra cable we didn’t expect. Tracing the cable led to a revelation: the main control box controls the solenoid, the mechanical device responsible for unlocking the gate, through the junction box!
Having access to the solenoid control wire changed our approach dramatically. Solenoids are just electromagnets that have two states: unpowered (locked) and powered (unlocked); no security measures, no protocols to snoop. With this easy access point, we could just apply our own power to the solenoid to unlock the gate. In addition, the 12 volt DC auxiliary power from a terminal in the voice box would be perfect to power a microcontroller.
Here is the plan we came up with:
- Split the wire that runs to the lock housing and triggers the solenoid. Connect the split end to a Wi-Fi-enabled ESP32 relay board.
- Write firmware in Rust to turn the ESP32 into a Matter client that we can connect to Frank’s Apple Home.
- Hide the board inside the little junction box, conveniently placed there by the building for maximum discreetness.
- Power the board by plugging a power cable into the Doorking voice box and running the cable into the junction.
It was time to order parts. Thankfully Hazel found an ESP32 relay board that did exactly what we wanted, having two relays to control the solenoid. The circuit ended up looking like this:
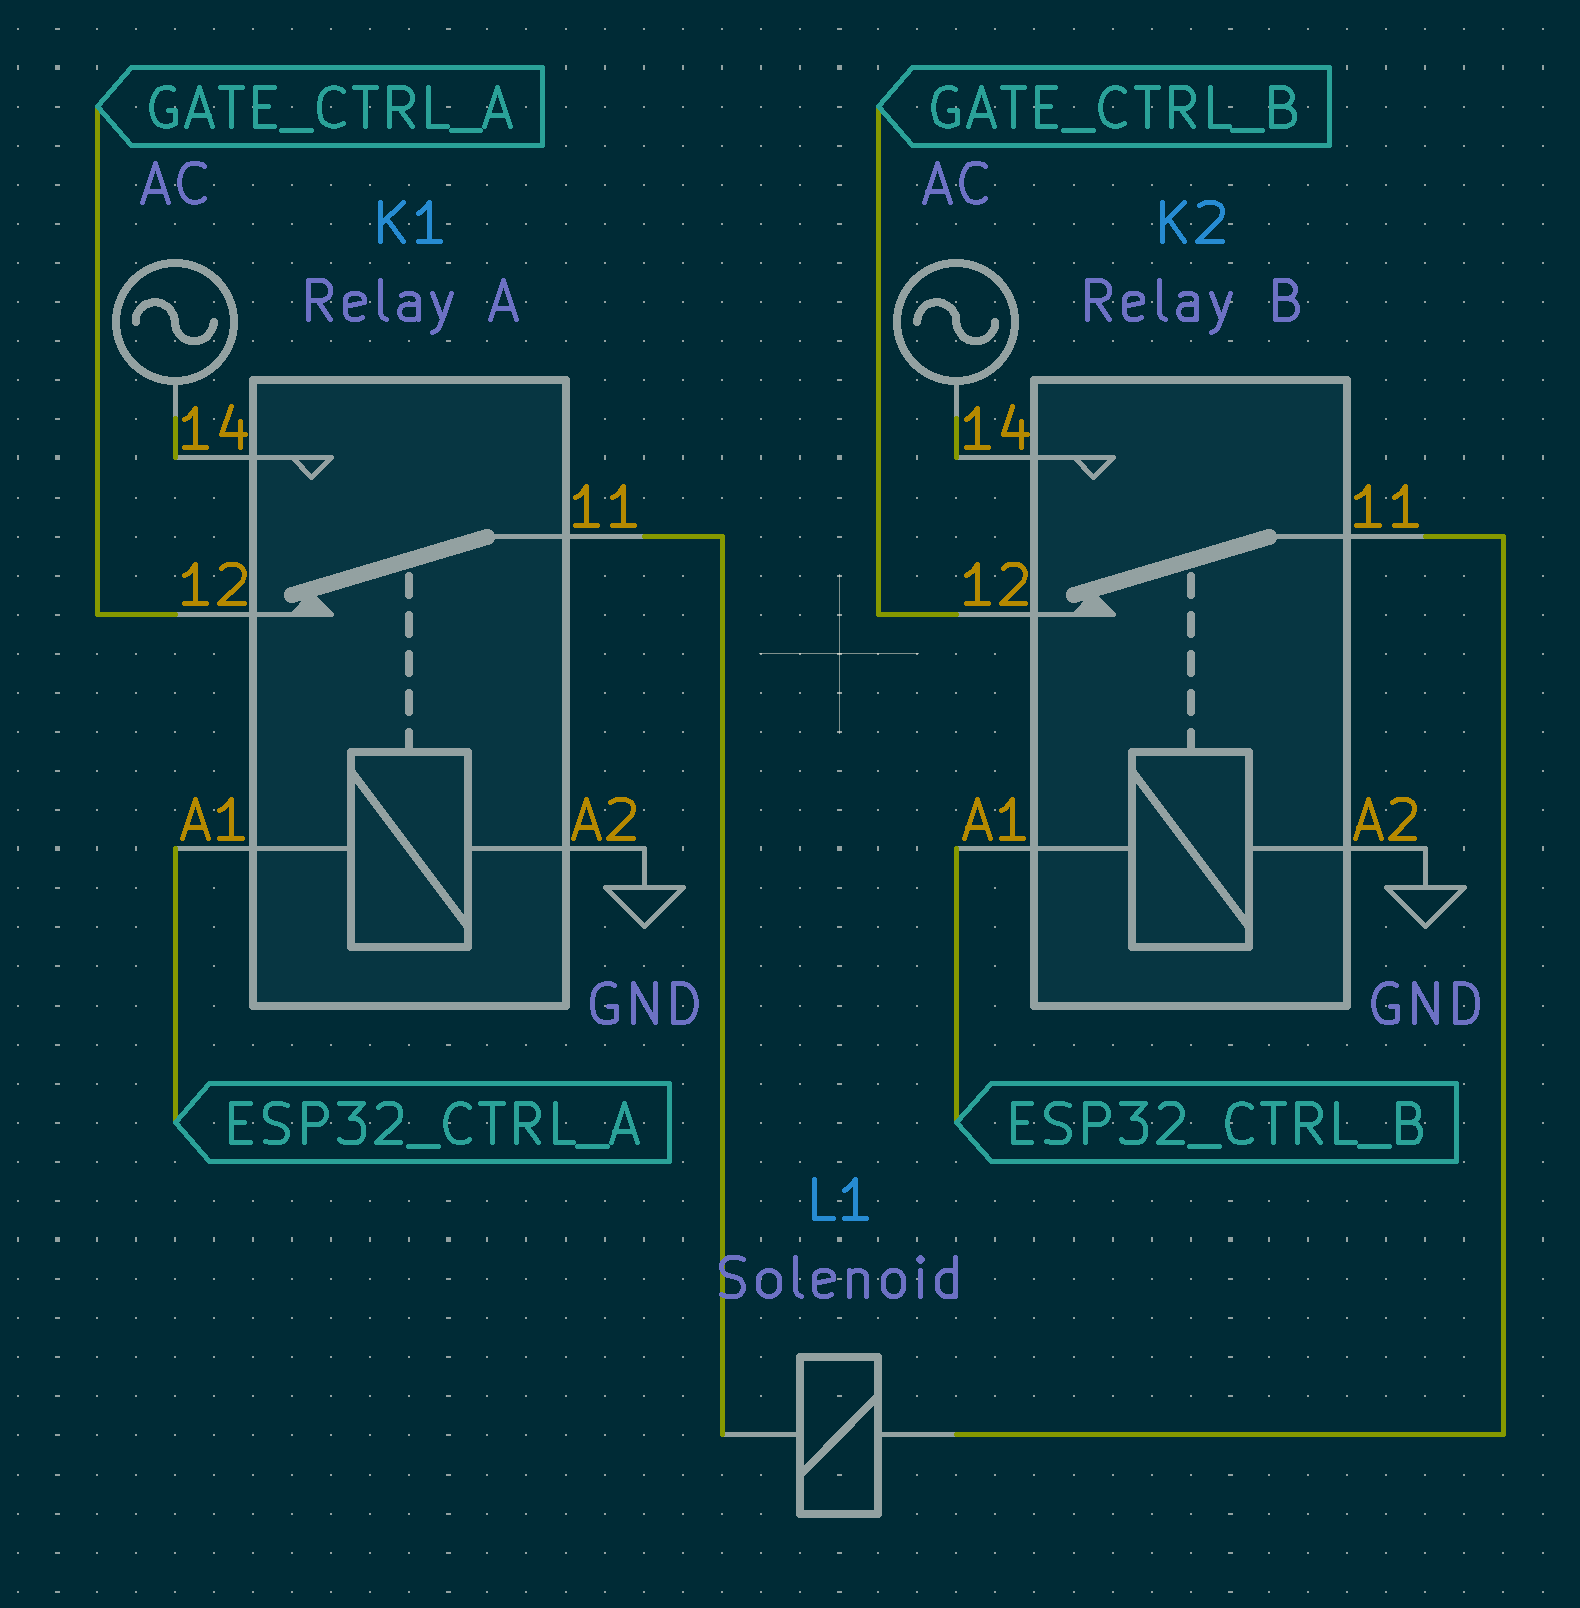
This setup ensures that if our circuit were to fail, the system would still remain fully functional since the gate control commands are passed through when no power is applied to the relay.1
Software
Once we had the hardware set, next up was the software. We chose to use a Matter library written in Rust with specializations for the ESP32. This would allow us to use an open standard (with freely accessible specs, no filetype:pdf digging necessary!) to connect to Frank’s Apple Home setup.
The software can be described by this state machine:
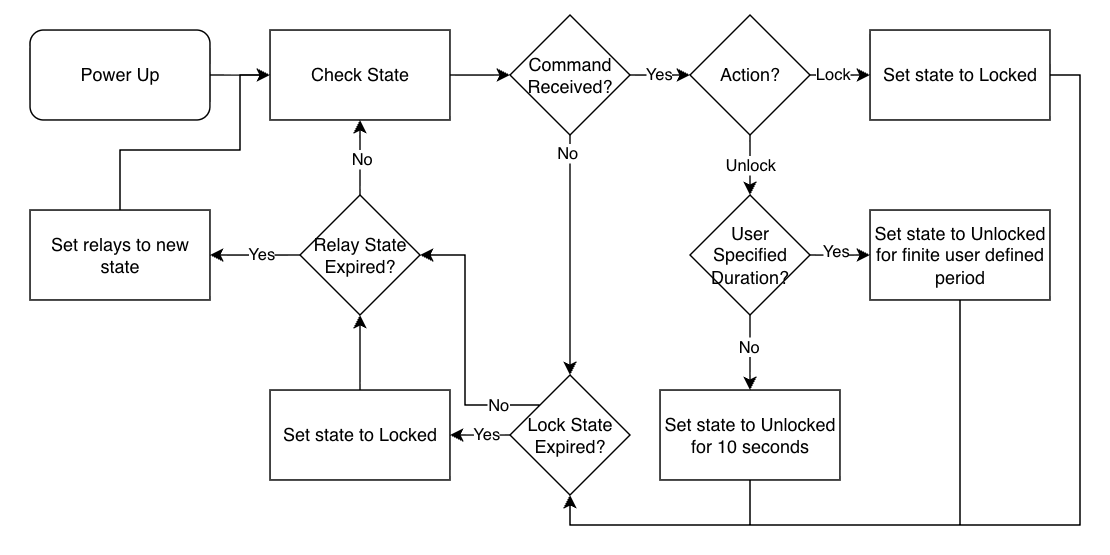
It’s pretty simple. Startup and connect to the network. Once connected, start listening for commands from the home. When instructed, unlock the gate for a certain amount of time (user configurable with a default time of ten seconds), then re-lock the gate. Importantly, the software will never let the gate stay unlocked indefinitely, ensuring the system remains secure. You can look at the code yourself here.
Stack Smashing
One particularly infuriating issue we encountered during development was the ESP32’s very limited RAM space. Launching both the Wi-Fi and Bluetooth stacks together would almost always cause memory corruption due to overallocation, leading to a hard reset after invalid memory access. The Matter implementation we used utilized the ESP32’s older Bluedroid Bluetooth stack instead of the newer NimBLE, making the problem even worse. After manually tweaking the size of the stack for a long time, even with the help of Claude Code we were unable to get it stable. However, there was a solution in store: only enable either Wi-Fi or Bluetooth, and have Claude dump a bunch of memory-saving config settings into sdkconfig.defaults. Bluetooth is only necessary for the provisioning process, and Wi-Fi is only necessary for regular operation. There is a small window during the provisioning process where both need to be active, but this is short enough to not cause problems. Now, in normal operation the ESP32 immediately disables Bluetooth, eliminating the problem.
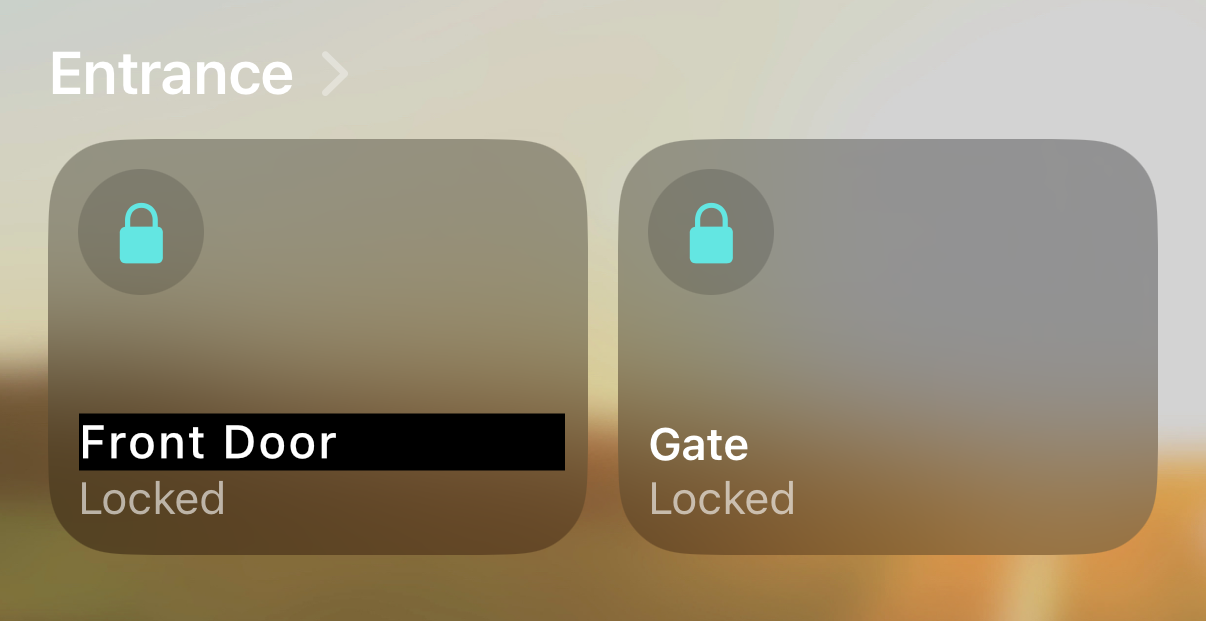
Once we handled all of the edge cases, the device showed up in Apple Home!
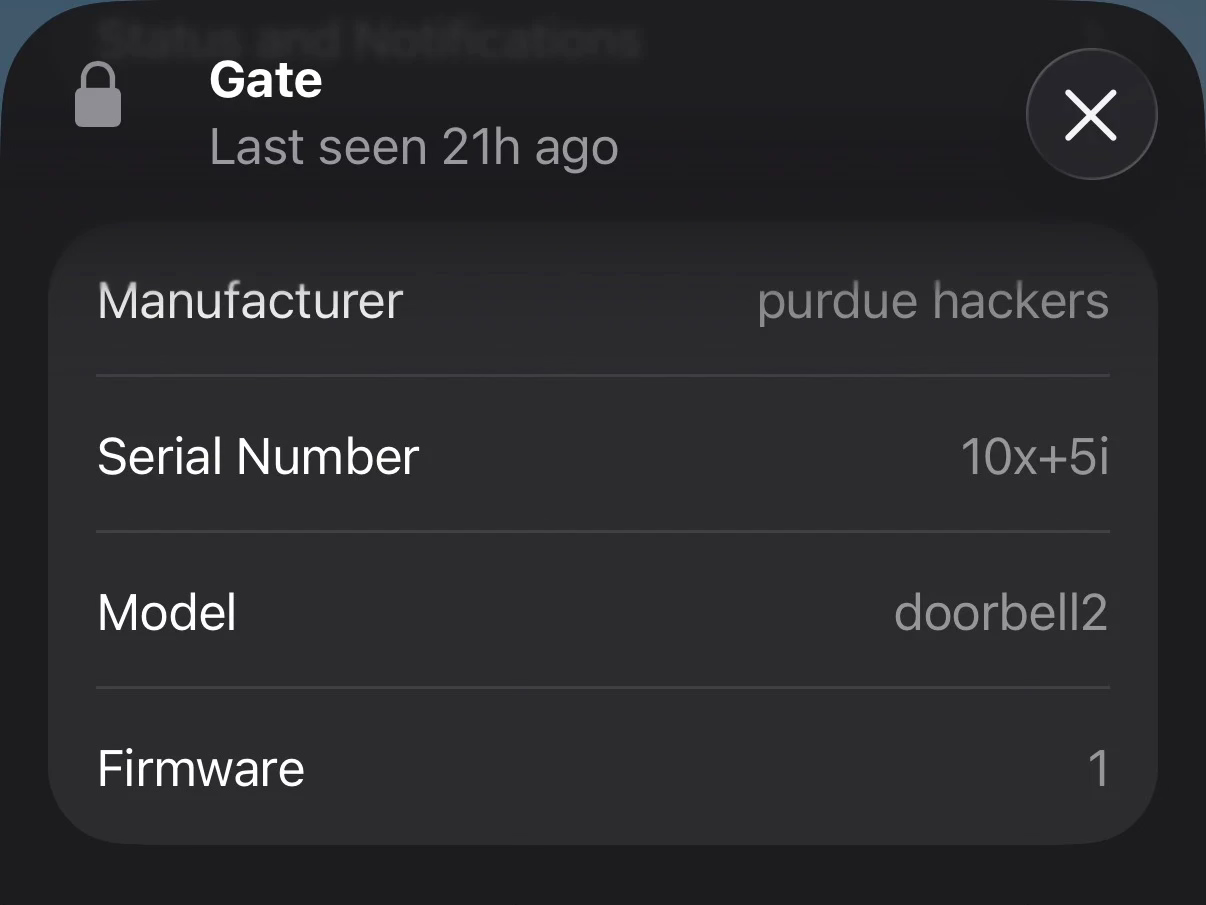
Fun fact, you can set the manufacturer information to whatever you’d like:
Deployment
Once we had the software running perfectly, we moved on to deploying the device. Luckily, the board we bought fit perfectly into the small junction box that started us down this path, so it would be completely invisible to anyone who passed by. Hazel had already run power lines from the voice box to the junction box, and we had already purchased a Wi-Fi extender to ensure the signal was strong, so all we needed to do is hook things in. After a lot of careful splicing by Hazel, it was installed! We connected power in the voice box, aaaaannnnnndddddd… nothing. No power.
This was bad. Something had bucked our expectations, but we had no idea what. Frank didn’t have a multimeter, so we were stuck trying to figure out if there was a fray in the power wire, or if there was maybe a blown component on our board, or any number of other potential problems. Eventually I got an idea: Frank owns a cordless drill. After rummaging around in his tool closet, I found what I was looking for: a cordless drill battery, rated to output 20 volts. I ran downstairs, connected it to the power wires, and eureka! It worked! The board fired up and connected to Apple Home. This was a wild feeling, being able to unlock the gate before I even got to it.
While it felt really good to know that the project could work, we needed to figure out what was going on with the power. After some digging I came across the service manual for the voice box, and I found something that should’ve been obvious: the 12 volt aux port was an input, not an output, for power sources such as solar panels. It was frustrating for us to discover this fact, but at least our board was functional. After a quick search I ordered a rectifying regulator that converts the 18 volt AC input to 12 volts DC. Shipping took forever, but once it arrived it fit right in alongside the ESP32 board inside the junction box. I connected it to the known-working AC power for the voice box, and power started flowing! We closed everything up, and we were done.
Hazel and I are super proud of our little box of secrets, and Frank couldn’t be happier. With his newfound capability to unlock the gate through Apple Home,
- Frank can unlock the building gate for himself with an easy tap on his phone, or remotely let guests in again without the intercom.
- Frank’s Home guests can now unlock both the building gate and his apartment’s smart lock from the Home app; it’s now an all-in-one way for them to easily enter his apartment.
As a bonus, the assembly is very discreet: it’s just one ESP32 and a small power device hidden in a screw-secured junction box that doesn’t interfere with the building’s primary access control system, giving it a much better chance of avoiding discovery.
This was such a fun project to work on, and it allowed me to dip my toes into circuit hacking, something I don’t get to do nearly enough. The components for this project are all super simple, so if you’re in the same position as Frank, give it a try! Tag me on Twitter if you get it working!
Footnotes
-
While it is theoretically possible that the relays could fail on through some sort of physical failure, this is so unlikely that we did not design for it. ↩